
Opening The DAW: Getting Started in Ableton Live - Part 1
- Tom Wormald

- Jan 16, 2024
- 7 min read
Updated: Jun 6, 2024
Using Ableton Live can be a daunting experience, especially if you’re new to DAWs in general. It can be difficult to know where to begin… but you’ve come to the right place. This tutorial will serve as an introduction to producing electronic music in Ableton Live, and we’ll go over some of the essentials to get your first song well underway.
Session View vs Arrangement View
The first thing you need to know about Ableton Live is that there are two 'views': Session View and Arrangement View. Session View is primarily used for live performance and experimentation, while Arrangement View is where you’ll spend most of your time (you guessed it) arranging your music.

Session View looks a bit like a grid with the track names at the top of your screen. If this is what you see, hit tab on your keyboard and you’ll be moved over to Arrangement View. You should now be looking at a more traditional timeline view.

Creating And Using Tracks
What Are Tracks?
Each track in Ableton Live typically represents one instrument. For example, you might have a lead synth track, a pad track, a kick drum track, or a sub-bass track. It’s important we give these instruments their own tracks, so we can treat them independently as we venture further into our production. In Arrangement View, you can see your tracks and track names listed vertically down the right-hand side of your screen. It’s likely your default session has a couple of tracks preloaded - perhaps named something like '1 Audio' or '1 Midi'.
There are three types of tracks in Ableton Live: audio tracks, MIDI tracks, and send/return tracks. In this tutorial, we'll be focusing on audio and MIDI tracks.
Our First Audio Track
An audio track is where you would drop audio files. You may want to drop a drum sample onto your timeline, or perhaps a loop you’ve purchased online. These are also the tracks you’d use to record audio into (e.g. vocals, guitars, drums, and hardware synthesizers).
Let’s start by creating a new audio track. Press cmd + T (Mac) or ctrl + T (Windows). Now, let's drop a percussion loop onto this track - either your own, or this free downloadable loop I found online. Make sure the tempo (at the top left of the screen) is set to match the tempo of your percussion loop (if you want to use the one I linked, it should be 100bpm). Drag the file from your Finder/File Explorer window straight into your Ableton Live window and onto the track we just made. The audio file you can now see in your session is known as a clip.
Click on the track title and hit cmd/ctrl + R to rename it. Type in 'Percussion Loop' and voila! Your first audio loop is ready to go. Hit the spacebar to listen to it. And an extra tip: if you highlight the clip and hit cmd/ctrl + L, you can loop that section!
Creating A Pad Sound Using A MIDI Track
MIDI stands for Musical Instrument Digital Interface, a standardised data type that allows digital instruments to communicate with each other. In Ableton Live (along with almost every DAW) we are able to 'write' MIDI data using a MIDI track. Let's load a MIDI track into our project by hitting cmd/ctrl + shift + T.
Before we start writing in our chords, we’ll need a software 'instrument' to play them. In the Ableton Live browser (found on the left of your screen), locate the search bar at the top, and search for the 'Aqueous Pad'. If you don't see it, ensure you have the 'all results' filter selected on the left of your screen. Now, with your MIDI track selected, double click on Aqueous Pad to load it onto your MIDI track, and we’re ready to write in our chords.
Let’s start by highlighting 4 bars of time underneath our percussion loop, within the MIDI track. To make this easy, look to the top of the screen to see bar markers. Once you have highlighted your 4 bars, hit cmd/ctrl + shift + M to create a MIDI clip. Now, double click on the top (coloured) section of the clip to bring up the the MIDI note editor. Hit B on your keyboard, and you'll be able to write MIDI notes with a left-click of your mouse.
Right-click anywhere in the MIDI Note Editor window to bring up your view options - you can select smaller/wider beat divisions on your grid to make your MIDI writing easier. Zoom in/out by pressing +/- while holding shift. You can move a MIDI note by clicking and dragging the note, and adjust the length by clicking and dragging on either end of the note.
Let’s write in some chords. You can make your own - or for an easy example, write 1 bar each of C Major (with C, E, G notes), G Major (with G, B, D notes), A Minor (with A, C, E notes), and F Major (with F, A, C notes).

Now, hit play! You should be hearing your new chord progression along with your percussion loop from earlier. It's a great start - but let's get it really popping with actual MIDI drums...
Writing MIDI Drums In Drum Rack
Let’s create another MIDI track (cmd/ctrl + shift + M) and this time load in a drum rack. You can do this by looking in the 'drums' section of the browser on the left side of the window. I should mention - each edition of Ableton Live features a different library size, with the Suite edition featuring the most extensive library, so drum racks may vary. However, all editions feature the Live Core Library - so, unless you have a drum rack you would prefer to load in, let’s go ahead and load in the 707 Core Kit.
Now, let’s highlight another 4-bar section within this track, and create another MIDI clip (cmd/ctrl + shift + M) as we did earlier. When you open the MIDI Note Editor this time, you’ll notice you can write in drum hits, rather than musical notes. So let's hit B to bring up the pen and do that! Write a kick drum on beats 1 and 3, and then a snare drum on beats 2 and 4. You can look at the top of the MIDI Note Editor window for bar and beat markers if you get confused.
Velocity is quite important when programming drums - this is the difference in sound as a drum/sound is hit or played harder. Usually, a high velocity corresponds with a high volume. At the bottom of our MIDI Note Editor window, you’ll see the velocity section. Each vertical stick and dot represents the velocity, measured between 1-127, for each of our drum hits. Click and drag across all your kick and snare MIDI notes to highlight them, and push the velocity all the way to the top (127).
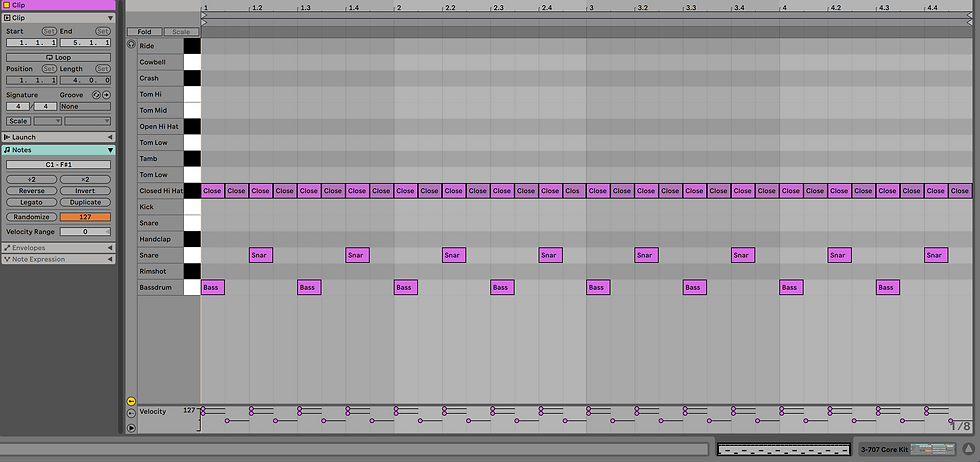
Next, let’s write in our hi-hats. Right-click and change the grid view to 1/8 beat division, and write a closed hi-hat on every 1/8th note. This is where velocity will drastically alter the feel of our groove. Head down to your velocity section, and lower the velocity of every second hi-hat strike to your taste. This will make the groove feel less robotic and frenetic. From here, if you haven’t already, copy your groove to fill out the entire 4 bar clip.
Level Balancing in Drum Rack

Mixing within Drum Rack is a tedious process.... so to help you on your way, I’ll give you a few pointers on basic level balancing. If you look to the very left of your Drum Rack plugin, you’ll see a few buttons lined up vertically.
Click the very bottom button (3 dots next to 3 horizontal lines) to bring up the 'chain list'. You’ll notice a new section that allows you to adjust the volume of each drum. Have a listen to your groove, and adjust the volume accordingly. You can even add plugins to each drum sound from here.
Writing A Melody + A Bonus Tip!
Now, for a bonus section - let’s create a melody. I’ll give you some tips, but I’ll leave you to be a little more creative here. Begin by loading up a lead sound - it could be a stock synth sound within Ableton Live, or your favourite third-party software synthesiser... or heck, even a virtual instrument if you’re feeling wild, like a virtual piano/keyboard or whatever tickles your fancy.
Now, listen up, because this tip changed my life...
In the chord progression I suggested earlier, the key signature is C major. This means that notes in the C major scale are going to be our best bet when writing a melody - and there's a very easy way to stay within a scale in MIDI Note Editor. Start by writing in every note within the scale anywhere within your clip - it doesn’t matter where. C major has no accidentals, so write in the notes C, D, E, F, G, A, and B. Move these notes outside of the clip restraints, all the way to either the left or right. Now, hit the 'Fold' button to the left of the editing area. As you can see, it hides every note that does not have a MIDI note written. So, now we only have the 'right' notes to choose from!

You can take this even further - highlight all of the notes we just entered, hit cmd/ctrl + C to copy, then cmd/ctrl + V to paste, and finally Shift + Up or Down arrow to move all of your notes up or down an octave. By repeating this process, you can cover every single note within your scale - so that with the 'Fold' function enabled, every note you write into your MIDI clip will be within your scale. This is a great way to get creative and experiment with very little brain power required. It seems like an annoying process, but I can assure you that in practice it does not take long at all.
That’s A Wrap
You're now all set to experiment! What we created today may not be an instant chart-topper, but it contains the knowledge you need to get started. If you’re already feeling adventurous, I encourage you to try Ableton Live's MIDI effects (arpeggiator, scale, random).
We’ll leave it at that for now - and just remember, the best way to learn is to get stuff wrong... it’s how I got there. So, don't go shutting down Ableton Live too easily! Mess around, have fun, make some bangers, and I’ll catch you next time!


Comments