
The Ultimate Guide To Prepare Your Track For Mixing
- Joseph Cheek

- Dec 19, 2023
- 10 min read
Updated: Feb 13, 2025
If you’ve recorded a song yourself, then firstly, congratulations - that’s a great achievement. Now you’re looking to get stuck into mixing, there are a few things you’ll need to do to make it a smooth process, whether you're doing it yourself or sending it to a mixing engineer.
This tutorial will ensure you've done everything you need to to best prepare your music for mixing.
There are three main sections in this tutorial: essential first steps, additional steps if you’re mixing yourself, and additional steps if somebody else is mixing your music.
I’ll be covering the following tasks for your success:
File management
Editing your tracks
Removing unwanted noises
Applying fades
Organising your tracks
Consolidating your tracks
Naming your tracks
Naming your audio clips
Creating effects sends
Inserting your favourite EQs and compressors
Let’s get started!
Mixing Preparation - No Matter Who Is Mixing
In this first section, I’ll discuss the steps that need to be completed regardless of who will be mixing the song - whether that's you or somebody else.
File Management
Now, I know what you’re thinking - this is boring. But I can’t stress enough how important good file management is. To tell you the truth, I’m actually a bit of a file management nut. I love things to be organised, with consistent naming conventions so that I’m never in a situation where I can’t find a file, or I can’t work out which session contains the latest mix.
In Figure 1, you can see typical naming conventions I use for sessions when working on a song. In the recording phase, I do a Save As each time I open up the session to record more, and update the number at the end of the filename (e.g. "Girl Like You_02.ptx").

When the song enters the editing stage, the suffix Edit is added, followed by a number. Generally, this number represents the editing stage - such as 01 for the drum editing stage, 02 for editing the other instruments, 03 for vocal tuning, and then 04 for vocal alignment. The session folder pictured was relatively straightforward, so it only required two stages of editing.
Saving multiple iterations of the session is important for two reasons: firstly, it'll help you keep track of the song's progress, and secondly, you'll always have a point to go back to if you accidentally destroy something in editing - which is quite easy to do when you’re a beginner (or more advanced!)!
Finally, when I’m working on an initial mix of a song, the filename will include the number 0.0 at the end, and update to 0.01, 0.02, 0.03, and so on each time I work on the song. Once I’ve sent the mix to the client, it enters the first revision stage, which I'll signify by updating the number to 1.01 the next time I make changes. Then, if any further revisions are required by the client, I'll save them with the number 2.01, and so on.
It sounds pedantic, but once you work out a naming convention that makes sense to you, and stick to it, it’ll save you hours - or perhaps days or weeks - of headaches in the years to come.
Name Your Tracks
Following on nicely from file management, naming conventions throughout all of your work are imperative. Make sure each track within your session is named - don’t keep the default track titles your DAW gives you (e.g. "Audio 1", "Instrument 1", "Aux 1", etc).
Save yourself time and label them properly as you go with something that immediately makes sense to you when you’re skimming through the session (e.g. "Gtr - lead", “Gtr - Rhy 1”, “Vox 01”, “BVox 01”, etc).
Edit Your Tracks
This step is crucial. If you are sending your tracks to a mixing engineer. it's expected that the tracks will already be edited. The price of a mixing engineer does not include editing - so don’t be shocked if you send out-of-tune, out-of-time tracks, and then receive a bill that was more than the mixing quote, with hours of editing added.
Examples of editing include:
Aligning the instruments to make sure everything is tight
Tuning vocals (and other elements of the song if their tuning is distracting)
Aligning multiple vocal layers (it's unpleasant to hear the same consonant hit several times separately, so the layers should sound tight together)
There are some great tools out there to help with editing. For example, Pro Tools has an 'elastic audio' feature built in to help with the timing of instruments. However, if you’re dealing with sources that have multiple microphones (e.g. a drum kit), the use of elastic audio on tracks will result in phase issues. So, it’s generally best to just cut up the audio and cross-fade. Pro Tools' Beat Detective algorithm does this automatically for you, and makes drum editing a breeze.
Melodyne is the industry standard software for tuning vocals. You can adjust timing within Melodyne with very few artifacts. Meanwhile, Vocalign is brilliant for aligning layers of vocals, giving your song a tight vocal sound in a matter of minutes.

Remove Unwanted Noises From Your Tracks
Before You Start Recording
The removal of unwanted noise starts in the recording process - even as soon as you’re thinking about recording your tracks at home.
The room you’re recording in must be as isolated as possible from outside noises. Nobody wants to hear the garbage truck going past in the middle of a beautiful vocal take. The same goes for distracting internal noises - such as an air conditioner, a ticking clock, computer hum, and so on.
It is also essential that the acoustics of the room are treated as well as you practically can. If you’re recording vocals in a bare room, a lot of natural reverb from the room will get into the vocal mic, which typically sounds terrible. Putting up absorptive materials will make an immediate positive impact on this. If you don’t have any proper acoustic panels, you could just hang up blankets, quilts, or cushions on the surfaces that are reflecting most.
Also, pay attention to what you’re wearing for the recording session. If you’re recording soft, delicate vocals, but you're wearing a jacket that rustles loudly every time you move, your recording is going to be full of your jacket sound.
After You’ve Recorded
After recording your tracks, you'll still have some unwanted noises to find and remove. Common noises include people clearing their throat between sections, moving around to get comfortable before the next verse, and bumping the mic stand.
Figure 3 is an example of a tambourine recording, which was recorded with a close mic and a room mic. Tambourines are notoriously hard to keep absolutely silent in the parts of the song they're not being played - see the little blips in between the main hits below? Go through and cut out all these litle blips from your tracks.

Once you’ve gone through and edited out the gaps between the hits, your tracks should look something like the tambourine track in Figure 4 below. Where applicable, remember to add a long-ish fade so you’re not immediately cutting the room sound off.
Pro Tools has the handy function of “strip silence”, which can attempt to automatically crop out all the in-between blip noises from your tracks. However, editing manually allows for more precision and can be quicker if it’s just one or two spots with noise.

If you’re using Pro Tools, you'll want to memorise the following keyboard shortcuts ASAP:
A - Trim everything to the left of the cursor
S - Trim everything to the right of the cursor
D - Fade to the left
G - Fade to the right
This brings us nicely to the next item on our mix prep checklist…
Apply Fades to Every Audio Clip
Fades are essential. Not an optional extra if you have the time... essential. Make the time! Don’t complain - just do them, and your music will thank you later.
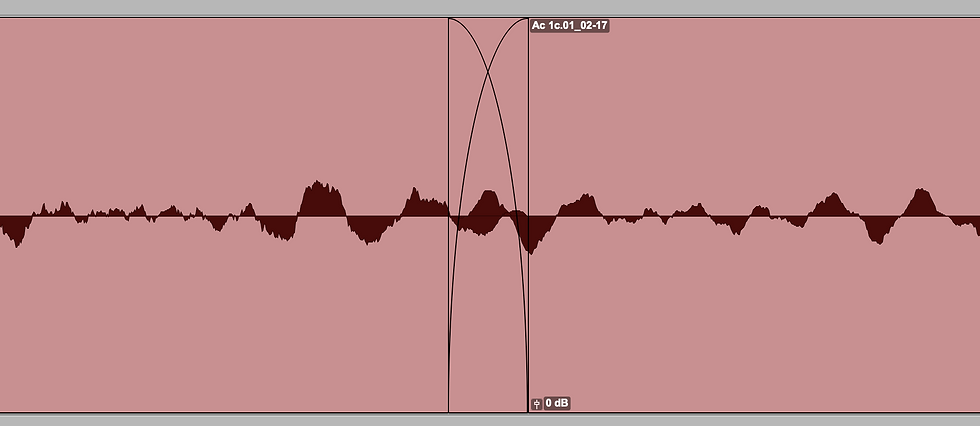
Without fades, you're leaves the door open for little clicks and pops to find their way into your music. I’ve lost count of the times I’ve been sent songs to mix and there are random clicks and pops throughout the track due to a lack of fades between audio clips. See Figure 5 below to understand this better.
Every audio clip should have a fade at the start and end, as per our tambourine track in Figure 4 above. When two audio clips intersect, there should be a crossfade between them.
Always check to make sure the audio sounds consistent across the fade between one clip and the next. Sometimes you may have to tweak the position or the length of the crossfade.
Figure 5 shows two clips that haven't had fades applied. You'll see the waveform is very discontinuous between the clips. This is what leads to unpleasant pops and clicks in your audio. Whereas, Figure 6 shows the clips with fades, which will mitigate any potential problems.

Organising Your Tracks
Ideally, you should set up recording templates that include all the typical tracks you’ll need during a recording session.
It's better to have more in your template than not enough, as it’s far quicker and easier to either hide or delete tracks you don’t need for a session than it is to create them, label them, colour code them, add typical plugins and sends to them, and so on. Without a well-organised template, you may find it hard to know where things are by the end of the recording session.
So, before mixing, be sure to group tracks together (e.g. all the guitar tracks together, all the keyboard and synth tracks together, etc). It’s best to use consistent colours for each of your groups, too. That way, you can quickly identify a group of tracks just by seeing their colour when you’re scrolling through your session.
It’s best to keep the instruments in the same general order in your sessions, so you’ll always have a pretty good idea where to find things. The larger the session, the more important this becomes.
I typically have the following groups of tracks in my default recording sessions.

Within most of these folders are subfolders, such as:
Guitars
Acoustic Guitars
Electric Guitars
Vocals
Lead Vocals
Backing Vocals
Mixing Preparation - When You’re Mixing Yourself
Insert Your Go-To Plugins
If you’ve done quite a bit of mixing, then you probably have certain plugins you like to use on certain instruments. It's a good idea to save time by adding these plugins before you start mixing. It doesn’t mean you have to use them in mixing, or that you can’t use other plugins - it just helps speed up creativity and mixing choices once you're getting stuck in. For example, instead of browsing for EQs. you can simply start tweaking them.
Ideally, these plugins should be a part of your template, so that they’re all there ready and waiting as soon as you create a new session.
Create Effects Sends
As with your go-to plugins, adding typical sends to tracks you might need them on before mixing will make the process much smoother and more efficient. This commonly includes your reverbs and delays.
And again, ideally, you'll have all your effects sends incorporated into your template. That way, you'll never have to add the same old standard reverb and delay sends again.
Mixing Preparation - When Somebody Else Is Mixing Your Music
When somebody else is mixing your tracks, there are a few extra steps involved to get everything ready for them. Unless you're both using the same DAW and the mixing engineer is happy to receive a session file, you’ll have to provide the individual WAV files for each stem.
Consolidate Your Tracks
The first step in preparing your stems to send is to consolidate all audio clips in each track.
Remember the example of removing unwanted noise from tambourine tracks in Figure 3 and 4 above? That process resulted in several separate clips of tambourine hits - shown in Figure 4. You can’t send a whole bunch of individual tambourine hits to your mixing engineer, as there’s no way they could possibly know where each of them goes in the song. And also, they’ll probably have an aneurysm if they see that come through.
Consolidating your clips really just means joining them all together, so that multiple small clips in a track are turned into one large clip that begins at the very start of the session and runs through to the end with silence in between.
It's essential that all your consolidated clips start at the same place. Otherwise, they won’t line up when the mixing engineer imports them into their session.
The Figures below show examples of unconsolidated clips, and then the same clips that have been consolidated.


Name Each Audio Clip
Now that you’ve consolidated each track, it’s time to name them.
Be kind to your mixing engineer. Name the tracks clearly and consistently - don’t go changing the naming convention for each of your 10 guitar tracks. Keep in mind that the names should be as brief as possible, whilst still giving all the important information.
Below are some examples of clear naming conventions that you might like to use. Click each group to expand the list.
Drums
Kick In
Kick Out
Kick Sub
Snare T
Snare B
Tom 1
Tom 2
Tom 3
OH L
OH R
Room L
Room R
Hats
Ride
Percussion
Conga L
Conga R
Shaker L
Shaker R
Tamb
Bass
Bass DI
Bass Amp
Guitars
Gtr Rhy 1
Gtr Rhy 2
Gtr Lead
Gtr Solo
Keys
Piano L
Piano R
Organ L
Organ R
Synth 1 L
Synth 1 R
Vocals
Vox - Lead
Vox - Harm 1
Vox - Harm 2
Bvox 1
Bvox 2
These are just some examples of naming conventions. You don't have to use these examples, but just remember to keep your chosen convention as clear and concise as possible.
Bounce Down A Demo Mix
You’ve probably done a little bit of mixing along the way to get your song closer to how you’d like it to sound when it’s finished. By exporting a rough demo mix to send to your mixing engineer, they'll get a decent idea of what you’d like to hear in terms of levels and panning.
Export Tracks
When using Pro Tools, you can simply highlight all the audio clips and hit Command-Shift-K to export them directly. This exports the clips exactly as they are - the audio will not be passed through any plugins, or turned up or down to match fader settings. Ensure that you export the tracks at the same sample rate and bit depth that the session is set to.
Check to see if your DAW has a similar batch exporting function. If not, you’ll need to go through and export each individual stem. If you are exporting in this way, make sure you’ve bypassed all plugins and effects, and set all faders and panning controls to their original positions prior to exporting.

Conclusion
Following these steps will ensure a smooth mixing process, either for you or the mixing engineer that you’re hiring. It gets all of the non-creative tasks out of the way so you can focus your energy solely on the mix and really bring your music to life.


Comments